 Magpie Search
How to search for text in images on Windows 11
What Windows can and can't do with text in pictures, and how to search all your images at once.
The short answer: Windows 11 doesn't read the text inside pictures, so File Explorer and the Start menu can't find a screenshot or photo by the words in it. You can read text from one picture at a time with the Snipping Tool's Text actions or PowerToys Text Extractor, but to search all your pictures by their text you need a tool that runs text recognition (OCR) on every image and keeps the result, such as Magpie Search.
This guide explains what each built-in option does, where it stops, and how to set up proper search for text in images.
Why Windows can't search text in pictures
To Windows, a screenshot is a grid of coloured pixels. The words you can see in it aren't stored anywhere as text. Windows Search builds its index from file names, properties (such as date taken or camera model) and, for documents, the text that a content filter extracts. Pictures don't have a filter that reads their text, so there is nothing for the index to store.
To change that, something has to look at every picture, recognise the letters in it (optical character recognition, or OCR) and save the result as searchable text. Windows has an OCR engine built in, but it uses it only in a few places, and none of them builds a searchable index of your pictures.
What Windows 11 can do on its own
1. Snipping Tool: Text actions
The Windows 11 Snipping Tool can read the text in a snip you've just taken.
- Press Win+Shift+S and select an area of the screen.
- Click the notification to open the snip in the Snipping Tool.
- Click the Text actions button in the toolbar. The recognised text is highlighted.
- Choose Copy all text, or select part of the text and copy it.
Limit: it works on one snip at a time and the text isn't saved. A week later, you can't search for it.
2. PowerToys Text Extractor
Microsoft PowerToys is a free add-on for Windows. Its Text Extractor reads text from any part of the screen.
- Install PowerToys from the Microsoft Store and turn on Text Extractor in its settings.
- Open the picture, press Win+Shift+T, and drag a box around the text.
- The text is copied to the clipboard.
Limit: you have to find and open the picture first, and it only reads languages that Windows has OCR support installed for.
3. OneNote: Copy Text from Picture
Paste or insert a picture into a OneNote page, right-click it and choose Copy Text from Picture. OneNote can also find text in pictures you've added to your notebooks. Limit: only pictures inside OneNote are covered, so you'd have to copy every screenshot into a notebook.
4. The Windows TIFF IFilter
Windows includes an optional component that runs OCR on TIFF files so Windows Search can index their text. Turn it on under Control Panel › Programs › Turn Windows features on or off › Windows TIFF IFilter. Limit: it only reads .tif and .tiff files. Screenshots are PNG and photos are JPG, so it rarely helps.
5. AI search on Copilot+ PCs
On Copilot+ PCs, which have a dedicated AI processor (NPU), Microsoft has been adding search that can find some photos and documents by describing them. It isn't available on other PCs, and coverage varies by Windows version and region.
Built-in options compared
| Method | Reads text in pictures | Searches many pictures at once | Formats |
|---|---|---|---|
| File Explorer search | No | Names and properties only | All |
| Snipping Tool Text actions | Yes, one snip | No | Your current snip |
| PowerToys Text Extractor | Yes, what's on screen | No | Anything visible |
| OneNote | Yes | Only inside OneNote | Pictures in notebooks |
| Windows TIFF IFilter | Yes | Yes | .tif and .tiff only |
| Magpie Search | Yes | Yes | .png .jpg .jpeg .bmp .gif .tif .tiff .webp and scanned PDFs |
How to search all your images with Magpie Search
Magpie Search is a free Windows app that reads every picture in the folders you choose with on-device OCR, stores the text in a small database on your PC, and lets you search it instantly, along with your documents, PDFs and notes.
- Install Magpie Search from the Microsoft Store or the direct installer.
- Choose a folder. On first run, pick Pictures, Screenshots, Downloads or any folder. You can add more later in Settings › Folders.
- Let it read. The reading screen shows live counts. Documents and notes are read first; pictures follow in the background. The first picture triggers a one-time download of the English text-recognition model (about 12 MB).
- Search. Press Ctrl+Shift+Space from anywhere and type a word you remember from the picture. Partial words match, so “confirm” finds “confirmation”.
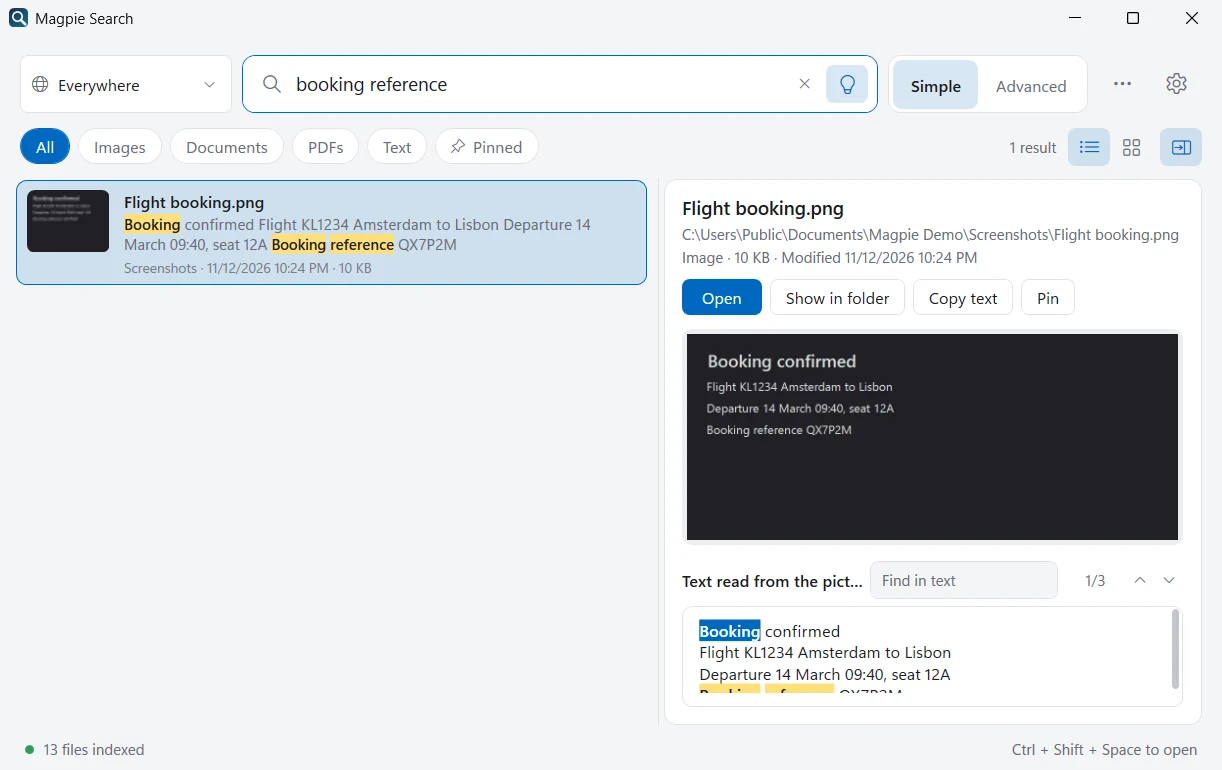
- Check the result. The preview pane shows the picture above everything Magpie read from it, with your words highlighted. Copy text copies it out.
Narrow the results
- Click the Images chip, or type
type:image, to see only pictures. - Add a date:
type:image receipt last monthormodified:7d. - Press Ctrl+L for the grid view, which shows picture cards instead of rows.
Tips for better text recognition
- Add your languages. English is on by default. If your pictures contain other languages, tick them in Settings › Text recognition and they're read again automatically.
- Prefer Accurate mode for small screen text. Magpie chooses Fast mode (Windows' built-in OCR) on light PCs; you can switch in Settings › Text recognition.
- Very small, blurry or rotated text may not be readable by any OCR engine. A sharper screenshot helps more than any setting.
- Dark-mode screenshots are fine: Magpie handles light text on dark backgrounds.
A note on privacy
Screenshots often contain things you wouldn't post online: passwords, addresses, chats, bank details. Magpie reads them entirely on your PC. The only thing it downloads is the text-recognition model for each language you switch on, and nothing about your pictures is sent anywhere.
Which approach fits you?
If you only need text from a picture now and then, the Snipping Tool or PowerToys is enough. If you regularly think “I know I have a screenshot of that somewhere”, or you keep photos of documents, receipts and slides, an index that covers every picture saves the hunting. Magpie Search also keeps your documents, PDFs and notes in the same search, so you don't have to remember whether something was a screenshot or a file.
Frequently asked questions
Can File Explorer search the text inside a PNG or JPG?
No. File Explorer searches the file name and properties of pictures, but it doesn't read the text in them. The only built-in exception is the optional Windows TIFF IFilter, which reads text in .tif and .tiff files only.
Does PowerToys Text Extractor make images searchable?
No. Text Extractor reads the text in whatever is on your screen right now and copies it to the clipboard. It doesn't save that text or build an index, so it can't help you find a picture later.
Is it safe to use online OCR websites for my screenshots?
Online OCR tools upload your picture to someone else's server. That's fine for a public poster, but not for screenshots of passwords, bank details, chats or work documents. Tools that run on your PC, such as PowerToys Text Extractor or Magpie Search, avoid that.
How long does it take Magpie to read thousands of pictures?
It depends on your PC and how much text the pictures contain. Magpie reads documents and notes first, because they take milliseconds each, then works through pictures one at a time in the background. You can search everything that's been read so far while it works.